


The phrases "free unlimited Internet access" or "free internet browsing trick" should pique the interest of anyone, if not everyone, who wants to reduce their Internet spending. When it comes to saving money, we've analyzed How To Install V2Ray+WS+TLS Script With one Click to provide you with the general knowledge of creating your own free Internet premium files.
However, for the sake of this post, the focus will be on
how to connect and get free internet using the Ha Tunnel Plus
What is free Internet?
This is no question at all to the everyday Techfoe reader. But I will still explain it for the sake of those reading it for the first time. The term free Internet refers to the Internet that you can use for free without paying a dime for it.
Yes. I know some people will be like; "Nah, that ain't possible", but then it's very much real and possible. We've done it before, created for many, and as well written educational tutorials that have helped many to get theirs. That then brings us to the next question.
How to get free Internet access?
If you are new to this site or don't understand some terms you see when you try to create a free Internet configuration then I will suggest that you check out this article before you proceed to the next step of this post. It will help you in creating super fast droid VPN accounts plus life time free stable settings which gives free internet access world wide
There are several ways to get free Internet tricks on any ISP in the world. It doesn't matter where you stay or what network that you use, all that is needed is a little understanding of your network and then a little trick to get free internet access (though, they are some networks that need more time because they are cumbersome even to understand)
When I mention ISP, I'm referring to networks like Vodacom, MTN, CellC, Safaricom, Telenor, Vodafone, Airtel, Glo, Jio, Digicel, Vivo, Ooredoo, Smart, Globe TM, Mobily, etc. It doesn't matter the name of your network or where it's located because the methods to access free internet are all the same across all the networks (including yours).
I have written several tutorials to help you on how to get free internet. This link will show you how to get free Internet access using Droid VPN + open ports + working proxy, port scanning for free Internet.
Also Read: How To Unlock All DSTV Channels On Your Home Decorder
I also wrote another post that How To Find Any WI-FI Password With Android/PC Tested Working -Method . There's even a spam method that can give up to a terabyte of free browsing data.
Though I will advise anyone that wants to learn how to create free Internet to read the above links, you may also download Ha Tunnel Plus MOD Apk to safely enjoy the App without crying for time renewal as the app will give you unlimited time that can be used for free Internet access. Check it out and thank me later.
Now that you've known how to get free Internet, we will head over to the next step...which brings us to Ha Tunnel Plus VPN.
Note: You can drop your say in the comment section in case you have any questions in regards to anything that you don't understand concerning free Internet tricks.
Ha Tunnel Plus VPN
There are several tunneling apps that you can use to get free unlimited Internet access. However, our focus today will be on Ha Tunnel Plus VPN app because it has many features that several other tunneling apps have.
Ha Tunnel? Sounds more like you laughing (ha ha ha ha) when tunneling for free internet access, so hence the name Ha Tunnel (LOL). Don't mind me, I don't know how the name came about.
When you Google the term "Ha Tunnel Plus", you see search results such as "Ha Tunnel Plus for iPhone", "Ha Tunnel Plus for Windows", etc. So popular has the app grown that users wish for it on other OS platforms.
Ha Tunnel Plus tunneling app has become the choice app of many free internet users because it has the features of Psiphon, Finch VPN, and HTTP Injector combined in one tunneling app. And yes, it doesn't require you to create an account that has to be renewed every 3 or 7 days.
Another thing is that the developers of the app are very active as they do roll out updates every now and then.
How to create Ha Tunnel Plus working free Internet trick settings
This is where the real tutorial begins. All that we've been talking about is to prepare you on how to create a working free internet configuration settings. Again, all the methods in this post can be used on any ISP's network in the world, including yours.
Also Read: How to Find and Remove Malware on Your Android Device
We will treat all the methods that Ha Tunnel offers for free Internet access. Before then, you need a few things before we begin to cook up the settings.
Requirements:
- Ha Tunnel Plus app: The latest version of Ha Tunnel Plus VPN app (Click here to download)
- SIM card: Any SIM card of your choice with zero data and airtime (for those who will be trying theirs out as the tutorial progresses)
- Host/SNI: A working host/SNI or the one that you want to test (hope you read the methods provided in this post before jumping here?)
- Patience: Yes, patience. Creating a free net trick can be easy and fun, but sometimes it can be frustrating. So yes, you need patience.
1. Direct Connection:
This method doesn't require you to do anything special because the steps are very much simple. Read on.
When to use: This method comes in handy when your network has an open port on its server, or you want to use a social media pack, or a similar subscription to access free internet on your device. But then, this method doesn't always work, which is what makes it appear first.
- Open your Ha Tunnel Plus app
- Go to Connection Mode and enable Custom Setup
- Click on the drop-down arrow icon and select Direct Connection (Internet)
- Go up right and click on Select Port, and then select your port from the drop-down (The most common ports used in this case are 80,443, 3128, and 8080)

- After then, go to Select Server and select the server of your choice. If not leave the default server that way.
- Click on Start and wait for your connection to go through. You can check the Log section for your connection status
2. Custom Payload (TCP Mode):
This is where things begin to get interesting. This connection method uses TCP (Transmission Control Protocol) for users to access free Internet access. Though not stated, this uses the HTTP method.
When to use: This can be used for tricks that offer free unlimited access without paying for it, and as well as social media packs, eLearning bundles, and similar stuff. I will make use of this Sierra Leone host moh.gov.sl on the Orange network
- Open your Ha Tunnel Plus app
- Go to Connection Mode and enable Custom Setup
- Click on the drop-down arrow icon and select Custom Payload (TCP Mode)

- Locate the hamburger button at the top upper left corner of your screen and click on it.

- Click on Payload Generator and you will see exactly what is in the screenshot below

- Host: Here you put in your free host/SNI. It could the host of even the subscription that you want to use and circumvent your ISP restriction for free Internet access.
- Method: This is your method of injection (HTTP requests) to trick your ISP. There is a drop-down for you to select the one that best suits you.

- HTTP-Bug: Is your host an HTTP bug? Yes, most likely it is. For that, this should be your preferred choice when creating configuration since it does the work of the GET. This method is specific and forces your connection through.
- GET: This method should be the second thing you tick when the HTTP-Bug method fails. GET does the job too very well. The GET method pulls data from the web server that you are posting it to.
- CONNECT: Not really popular though, this method is used to create an HTTP tunnel via a proxy server. This method is mostly used for SSL connections, but it also works for HTTP as well.
- HTTP Version: I won't start explaining everything from scratch because we might end up diverting from the topic of today. There are three versions of HTTP here:

- HTTP/1.0: This guy is old and is heading into retirement already. No need to use it unless you are very sure of what you are doing.
- HTTP/1.1: This guy is the most common version of HTTP in use today. To avoid issues, this should be your preferred destination.
- HTTP/2: Unlike HTTP/1.1, this guy is better and faster. It comes with improved performance, reduced latency, etc, but hasn't seen wide adoption as the former.
- HTTP HEADERS: This section enables the communication or transfer of data between a web server and a client with an HTTP request or response.

- Keep Alive: This general-type header allows the sender to set the maximum amount of requests or how long a persistent connection should stay open. You need this option for your connection.
- User-Agent: This request header is like a middle guy that retrieves, renders and as well, facilitates end-user interaction with the web content. Long story short, you need it for free Internet surfing.
- Online Host: let's not complicate things. This is the webserver and you
definitelyneed it.
- Forwarded For: This enables this app to obtain endpoint information. Enable this only when necessary......by necessary I mean when the main option doesn't work for you.
Please I won't be able to discuss Close, Referrer, and Forward Host. I'm already trying my best to beat down this write-up.
So this is what I came out with from the Sierra Leone Orange free host (moh.gov.sl). Once you are done, click on Generate.
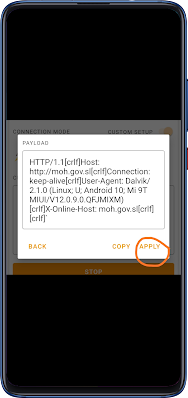
After clicking on Generate, you will be taken to another page where you will have to confirm the details. If it's okay, click on Apply to apply the settings Ha Tunnel Plus.
Click on Connect and then wait for the connection to go through. You can also check the log section for your connection status.

3. Custom Host Header (HTTP Mode):
First of all, I don't use this because (I believe) it doesn't really do that much. HTTP Mode is written there but you don't see anything other than the name and a Custom Host/Payload. The makers of this app should have also given this guy a payload generator just as they did with the TCP.
If the connection protocol must be HTTP and not TCP or SSL, I will suggest you connect through an HTTP Proxy if that will do. If not, take a walk.

Anyway, you can put in your Custom Host and then select the port it will run on in the Select Port section. Also, check the log section too for the status of your connection
4. Custom SNI (SSL TLS Mode):
The SNI (Server Name Indication) is another method to use for free Internet access on the Ha Tunnel Plus app. This method overnight became very popular since tricks on it lasts longer. Tricks tunneled via HTTP, TCP, UDP, etc. do easily get blocked when shared with many users. This is because your ISP knows much about the above methods.
However, SNI not until recently wasn't used much. The method is still new to them and your region might not even support it (for now) which should be good news to you.
When to use: This method can be used for all kinds of tricks. This includes tricks that offer free unlimited access without you paying for it, and as well as social media packs, eLearning bundles, free hosts, etc. I will make use of cdc.gov for Telikom Papua New Guinea, and 45.33.4.164 for MTN Ghana.
For those who need urgent SNI, (in whispers) there is a way in which you can get free SNI/hosts without much stress. Take a few minutes of your time and check it out from Howdy.id
- Open your Ha Tunnel Plus app
- Go to Connection Mode and enable Custom Setup
- Click on the drop-down arrow icon and select Custom SNI (SSL, TLS Mode)

- You can now type in your SNI in the Custom SNI space provided, tick Use Realm Host (v2), and then Start.

- Or this

5. How to export Ha Tunnel Plus .hat free Internet file
You must have done your settings and confirm the configuration to be working
- Click on the hamburger icon and then Export Config

- You will see the below when you click on Export Config

- Filename: You name the file name here
- Add Description/Message: This is where you talk about the .hat configuration file
- Anti-Sniff: This prevents the config from being sniffed
- Mobile Data: When you tick this option, only those on the mobile network will be able to use the configuration. It won't work for WiFi users.
- Block Root: This will block Android users on a rooted device
- Password: When you enable this, users will need a password from you to use the configuration fileSet Expiry: This is used to step an expiry date for the configuration to expire.
- Now click on Export and the configuration will be exported to Ha Tunnel Plus folder on your phone.
How to import Ha Tunnel Plus .hat free Internet file

- How to get extra time on Ha Tunnel Plus tunneling app
- How to speed up Ha Tunnel Plus Internet connection and avoid common errors


0 Comments